
Monday Blues ...
Grey skies …
but I have been on no planes! *woop! woop!*
It was so quiet in the Stuttgart office today – my boss is in America for the week, and all the Business managers are in the UK for sales training. It was also kind of nice it being so quiet – it means that I can just keep my head down and get on with it. I was hoping not to have to return to Hungary for another 4 weeks or so, but I was asked to travel next week to train our new designer. She has worked with us before, but so many things has happened since she left; new team, new products, new location … so I have been asked (very nicely) if I would go with her and introduce her to the R&D team. No problemo!
I was happy to put my name down for a bookmark swap today, I wonder who I will get as my partner ... hmm … I have so many lovely beads, and loadsa ideas already whirring round in my brain so I’m sure I’ll be able to make something nice!
Last evening, also – not much happening! I made sweet thai chicken wraps for Joe and I for dinner and I have stared at my beads … yes … stared at them! *oh the Monday blues also affect the mojo!*
So, rather than feeling a failure on the creative side – I applied myself to write up the beaded bead tutorial for you all. My goodness – it really is hard work isn’t it?! God knows how you all write beading instructions! I got in such a twaddle with it from the word go! I had major brain farts!
If you were all sat round the table with me, it would be so much easier to explain …
So, with my apologies – here are the instructions!
You’d probably be better just looking at the pictures!! :p *lol*
*** ***

You need per bead:
• 6mm Pearl rounds – x4
• 4mm Crystal Bicones – x8
• Seedies
In complementing colours
You can substitute the main beads for different sizes – as long as there is a maximum of 2mm in size difference between the round beads and bicones, they will sit well together.
You start building the bead by using Right Angle Weave
(double thread stringing method)
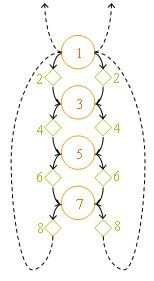
2: Continue by adding 1 bicone on each end of the string,
3: Add on another pearl bead and cross both lines through.
4: Continue by adding 1 bicone on each end of the string,
5: Add on another pearl bead and cross both lines through.
6: Again adding 1 bicone on each end of the string,
7: Add on another pearl bead and cross both lines through.
8: Finally the last 2 bicones
9: Once complete – string the strings back through bead #1 and pull tight. (Ensure that the sting on the right side, enters bead #1 from the right side, and that the string on the left side enters bead #1 from the left side – otherwise you will get a tangled string.)

1: When the bead is now bunched together, you start to see the base of the bead. Now it is time to embellish it with seedies. The quantity of seed beads does depend on the size of seed beads that you want to use (I personally try to keep tm as small as possible) and it also depends on what size you have used for your main pearl beads.
String on each side seed beads so when they meet together, they meet in the middle of the big pearl beads comfortably.
2: When they meet in the middle, you use 1 bead to thread both strings through (see red bead) and you work your way out again to the next pearl bead so it forms an “X” and then the ends thread through the next main bead. Repeat another 3 times around the bead!
See, now you have it!
What I do to finish off, I then use the remaining strings to thread through the bicones once again, with half-hich knots inbetween. Then once finished, cut it short with a dab of glue!!
If you make any - would love to see them! Send me the link of your photos!
Thanks!
No comments:
Post a Comment